Night Hawk Drone Reviews – (Expert Analysis Report!) Official Website Results Before Buy!
Night Hawk Drone Reviews
Drones have gone from novelty gadgets to indispensable tools for creators, hobbyists, and professionals. If you’re eyeing the Night Hawk Drone, you’re likely looking for a nimble quadcopter that can capture crisp footage, handle wind like a champ, and be easy enough for beginners without feeling “toy-Ish.” This guide breaks down everything you should know—what the Night Hawk Drone is built to do, who it’s for, how it flies, what to expect from the camera, battery, and range, and how to get the most out of it from day one.
Click Here to Buy Night Hawk Drone Now
What is the Night Hawk Drone?
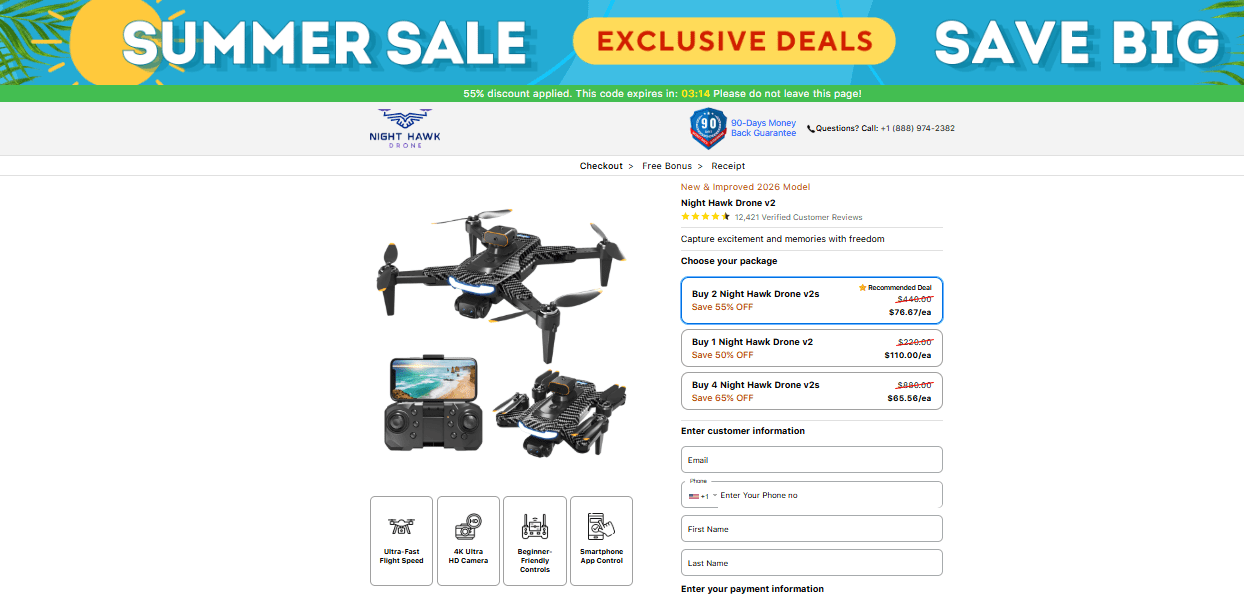
At its core, the Night Hawk Drone is a foldable, camera-equipped quadcopter designed to balance portability with performance. The “Night Hawk” name nods to two ideas: stealthy transport (it folds small and travels light) and confident low-light capability (sensor tuning, gimbal stabilization, and smart exposure modes to keep footage usable at dusk or dawn). It aims squarely at creators and enthusiasts who want a drone that’s easy to pack, quick to deploy, and reliable across a variety of filming scenarios—urban skylines, beach sunrises, forest trails, or rural farmland.
Key Value Promises
- Portable design: Foldable arms, compact profile, quick-release propellers.
- Stabilized imaging: Multi-axis gimbal plus electronic image stabilization (EIS) to smooth footage.
- Beginner friendly: One-tap takeoff/landing, optical flow positioning, and safety failsafes.
- Smart flight modes: Follow Me, Orbit/Point of Interest, Waypoints, and automatic Return-to-Home.
- Balanced battery life: Enough flight time per pack to get useful shots without constant swapping.
Grab Your Night Hawk Drone — Click Here
Who the Night Hawk Drone Is For
- Travel vloggers & content creators: You need a compact system that sets up fast and pulls stable 2.7K–4K-class footage without a trunk full of gear.
- Real estate agents & small businesses: Smooth neighborhood flyovers, building exteriors, parking lots, and roof inspections with minimal training.
- Hobbyists & learners: If you’re stepping up from toy drones, Night Hawk’s flight aids make it a forgiving upgrade.
- Outdoor adventurers: Hikers, campers, and cyclists who want cinematic B-roll of trails, lakes, and viewpoints—without lugging heavy rigs.
Design & Build Quality
Foldable, Packable, Practical
Foldable arms reduce the footprint to easily slip into a sling bag or daypack. Most kits include a molded case; if you’re upgrading, consider a weather-resistant hard case with custom foam.
Materials & Durability
A mix of impact-resistant polymers and reinforced joints strikes a balance between weight and toughness. Expect mild scuff resistance and replaceable propellers. It’s not a crash tank, but it’s tougher than toy-grade craft.
Visibility & Lighting
Low-profile LED status lights help with orientation during line-of-sight flights and assist with landing in dim conditions. Remember: LEDs are not a substitute for anti-collision beacons required by some jurisdictions.
Click Here to Get the Night Hawk Drone at Best Price
Setup & First Flight
Unboxing Checklist
- Airframe (folded)
- Remote controller
- Battery (1–3 depending on kit)
- Spare props + screwdriver
- Charging cable/hub
- Gimbal protector (remove before power-up)
- Quick-start guide / app QR code
Pre-Flight Steps
- Update firmware: Do this at home over Wi-Fi before heading out.
- Charge batteries fully: Drone and controller.
- Calibrate compass & IMU: Especially if traveling far from your last flight location.
- Check propellers: Tight, unwarped, and spinning freely.
- Pick a safe area: Open field, calm winds, clear of people and obstacles.
One-Tap Takeoff & Landing
The Night Hawk app and controller support automated takeoff/landing. For beginners, this reduces the “wobble moments” that cause early mishaps. Practice manual landings once you’re comfortable.
Limited Stock! Click Here to Buy Night Hawk Drone
Flight Performance
Stability & Handling
- GPS + optical flow: GPS for outdoor lock, optical sensors to help hold position over surfaces with texture (think grass, pavement, or patterned ground).
- Wind resistance: Expect solid stability in light-to-moderate breezes. In gusty conditions, fly higher than obstacle lines and keep a generous buffer for Return-to-Home (RTH).
Speed & Responsiveness
Standard mode keeps things smooth; Sport mode ups the pitch angle and throttle for zippier movement. Use Sport mode for long transits or dynamic reveals, then return to Normal for precise framing.
Safety Failsafes
- Auto RTH: Triggers on low battery or signal loss; verify the RTH altitude to clear trees and buildings.
- Geofence/altitude limits: Configure to your local rules; handy for beginners to avoid airspace violations.
Camera & Gimbal
Sensor & Resolution
Expect a camera in the 1/3″ to 1/2.3″ sensor class, with resolutions typically in the 2.7K–4K range at 24–30 fps, plus 1080p options up to 60 fps for smoother motion. For social content, 2.7K often hits a sweet spot: high detail with lighter files.
Gimbal Stabilization
A multi-axis mechanical gimbal dampens pitch/roll/yaw micro-movements, while EIS polishes smaller vibrations. The result: stable horizons and less “jello” effect, particularly during accelerations or turns.
Color & Profiles
You’ll find standard and flat color profiles. The standard profile yields punchy, share-ready footage. The flatter profile keeps more highlight/shadow range for grading in Premiere, Final Cut, or DaVinci Resolve.
Photos
Still images typically range from 12–20 MP with JPEG and, on some kits, RAW/DNG. Shoot RAW for sunsets, high-contrast scenes, or when you plan to edit.
Click Here to Order Your Night Hawk Drone Today
Intelligent Flight Modes (and When to Use Them)
- Follow Me: Locks onto a subject (you, a cyclist, a walker) and maintains distance/angle. Use on open trails with clear sky and minimal canopy to preserve GPS signal.
- Orbit / Point of Interest: Circles a subject at a set radius and altitude—great for landmarks, buildings, or campsite hero shots.
- Waypoints: Plot a flight path on the map for repeatable routes—handy for construction progress or farm survey footage.
- QuickShots / Pre-canned Moves: Dronies, rocket, circle, and helix shots deliver cinematic movement without stick finesse.
- Return-to-Home (Smart): Triggers automatically on low battery or disconnect; you can also initiate manually. Set RTH altitude higher than your tallest nearby obstacle.
Battery, Range, and Charging
Flight Time
Real-world flight time depends on wind, speed, and camera use. Budget conservatively: if the spec says ~25–30 minutes, plan flights in 18–22-minute chunks to leave reserve for RTH, retries, and a safety buffer.
Charging & Battery Care
- Use the included hub or a quality USB-C PD charger if supported.
- Avoid fully depleting packs; landing at 20–25% extends battery lifespan.
- Store at ~50–60% charge for longer periods; keep batteries cool and dry.
Range & Signal
In open areas, line-of-sight range is strong. Trees, buildings, and RF noise (urban Wi-Fi, power lines) can reduce signal quality. If you see frame drops in the live feed, climb a little, re-orient your controller antennas, or fly back towards line-of-sight.
Unlock Flight Power — Click Here to Buy Night Hawk Drone
App Experience & Controller
Controller Ergonomics
Expect a compact controller with phone clamp, detachable sticks, and a simple layout: two joysticks, return-to-home, power, and a dedicated record shutter button. Shoulder dials often control gimbal tilt and exposure compensation.
Mobile App
The app provides:
- Live 1080p-class video preview
- Map view with home point and RTH path
- Camera controls (ISO, shutter, white balance, resolution)
- Flight mode selection and settings
- Firmware update portal and flight logs
Tip: Turn on screen recording on your phone; it’s a handy backup of your FPV feed and HUD data.
Image Quality Tips (Pro Results Without Pro Headaches)
- Shoot at golden hours: Early morning and late afternoon give smoother light and richer colors.
- Lock exposure when framing: Tap to meter on your subject and lock AE to avoid hunting during pans.
- Use ND filters: If included or available, ND8/ND16 help keep shutter speed near 1/(2 × frame rate)—e.g., 1/60s at 30 fps—for natural motion blur.
- Mind your tilt: Slight downward tilt reduces prop intrusion and helps hide horizon haze.
- Fly slower than you think: Slow, deliberate motion looks more cinematic than fast sweeps.
- Bracket photos: If HDR is available, use it on high-contrast scenes.
Click Here for Official Night Hawk Drone Deal
Safety, Law, and Etiquette
- Know your local rules: Many regions require registration above certain weights, visual line of sight, and altitude caps (frequently ~120 m / 400 ft AGL). No flights near airports, helipads, or restricted zones.
- Respect privacy: Avoid flying over crowds or private spaces without permission.
- Check NOTAMs and weather: Wind, precipitation, and geomagnetic storms affect stability and GPS accuracy.
- Spotter helps: A friend watching line of sight while you’re heads-down on the screen boosts safety.
Troubleshooting & Common Gotchas
- Aircraft won’t arm: Check battery level, GPS lock, compass/IMU calibration, and that the gimbal guard is off.
- Toilet-bowling (slow spiraling): Recalibrate compass in an open area, away from metal or magnetic objects (benches, cars, phones in pockets).
- Shaky footage: Ensure gimbal is unlocked, props are balanced/not chipped, and avoid full-stick inputs during delicate shots.
- Video dropouts: Increase altitude for clearer line-of-sight, re-aim controller antennas, reduce distance, avoid Wi-Fi heavy zones.
- Drift indoors: Without GPS, rely on optical flow; ensure the floor has texture and lighting is adequate.
Night & Low-Light Flying
Despite the “Night” in its name, true night flying is regulated in many regions and often requires specific lighting. What you can do legally and safely is capture low-light scenes around dawn and dusk:
- Use higher ISO carefully: Balance noise with exposure; rely on gimbal stability to keep shutter lower rather than cranking ISO.
- Shoot in a flatter profile: Preserve shadows and highlights, then denoise and grade in post.
- Pick lit subjects: Cityscapes, bridges, and waterfronts look great with ambient illumination.
Accessories Worth Considering
- Extra batteries (Fly More–style kit): Two spares turn short sessions into productive shoots.
- ND filter kit: ND8/16/32 for bright days; CPL for glare on water or windows.
- Propeller guards: Useful for indoor practice and tight spaces.
- Hard case: For flights near water or rough travel.
- Landing pad: Keeps dust and pebbles out of the gimbal on takeoff/landing.
- Power bank: Top up the controller and phone on location.
Click Here for Official Night Hawk Drone Deal
Editing Workflow for Faster Turnarounds
- Cull and back up immediately: Sort by date/location; keep a structure like /Drone/NightHawk/YYYY-MM-DD/.
- Color-correct first: White balance and exposure before applying creative LUTs.
- Stabilize lightly: The gimbal does most of the work; use software stabilization sparingly to avoid warping.
- Export smartly: 4K masters for archival, 1080p proxies for social drafts, and platform-specific aspect ratios (16:9 YouTube, 9:16 Reels/Shorts, 1:1 older Instagram grid).
Responsible Maintenance
- After each flight: Inspect props, wipe the camera glass, and review the flight log for warnings.
- Every few weeks: Check motor bearings for debris, update firmware, test batteries for swelling or abnormal discharge.
- Storage: Cool, dry place. Don’t leave batteries in hot cars or fully charged for weeks.
Pros & Cons Summary
Pros
- Compact, foldable build ideal for travel
- Stable flight with beginner-friendly controls
- Solid camera with gimbal stabilization
- Useful smart modes (Follow, Orbit, Waypoints)
- Good value for creators and hobbyists
Cons
- Low-light performance is good, not miraculous (small sensors have limits)
- Range and signal depend heavily on environment
- Needs care with regulations and geofencing in some regions
- Flight time, while solid, still benefits from spare batteries
Buying Guide: Picking the Right Night Hawk Bundle
- Base package: Drone + controller + one battery. Fine if you’re testing the waters near home.
- Fly More–style combo: Adds 2+ batteries, charging hub, case, extra props—best value for real-world use.
- Filter bundle: If you plan outdoor travel content, prioritize a kit that includes ND filters.
- Care plan/warranty: Consider accidental damage coverage if you fly near water or in busy locations.
Click Here for Official Night Hawk Drone Deal
Checklist before you buy
- Confirm what’s included (batteries, hub, case, filters).
- Check local compliance (weight class, registration needs).
- Read return policy and support options.
- Make sure your phone is compatible with the app.
Night Hawk Drone Pricing List
Single Purchase Options
- 1 Night Hawk Drone (Basic Package) – $99.00
Perfect for beginners or those who just want one drone for personal use. - 2 Night Hawk Drones (Standard Bundle) – $179.00 ($89.50 each)
Save more when buying two – great for couples, friends, or gifting. - 4 Night Hawk Drones (Family Pack) – $349.00 ($87.25 each)
Best value for families or groups who want multiple drones.
Fly Now, Pay Less — Click Here to Buy Night Hawk Drone
Shipping & Warranty
- Standard Shipping (5–7 business days): Free on all orders
- Express Shipping (2–3 business days): $14.95
- Extended Warranty (1 Year): $29.99 per drone
Frequently Asked Questions (FAQ)
1) Is the Night Hawk Drone good for first-time pilots?
Yes. With one-tap takeoff/landing, GPS hold, and optical flow positioning, it’s beginner-friendly while still capable enough to grow with you.
2) Can it shoot stable 4K?
It typically supports 2.7K–4K-class recording with gimbal stabilization. For best results, fly smoothly and consider ND filters to keep shutter controlled.
3) How windy is too windy?
Light to moderate breezes are fine. If small trees are swaying or gusts exceed what you’d be comfortable biking against, postpone your flight.
4) What’s the real-world flight time?
Plan on 18–22 minutes per battery to keep a safety reserve, even if the spec sheet lists higher.
5) Do I need to register it?
Depends on your country and the drone’s weight. Check your local aviation authority before flying.
6) Can I fly at night?
Night operations are often restricted. Low-light at dawn/dusk may be permitted, but verify the rules and ensure you have appropriate lighting and visibility.
7) Is RAW photo supported?
Many kits support RAW/DNG alongside JPEG. If yours does, use RAW for tricky lighting or when you plan to edit heavily.
8) How do I avoid jerky footage?
Fly slower than you think, use cinematic mode when available, lock exposure, and avoid sudden yaw inputs during recording.
10 Quick Tips to Level Up Your Footage
- Plan a shot list before you arrive.
- Scout with Google Maps and sun-position apps to time golden hour.
- Set RTH altitude above the tallest nearby obstacle.
- Use a landing pad on sandy or dusty ground.
- Keep a microfiber cloth with your spare batteries.
- Avoid panning too fast—keep yaw movements subtle.
- Fly different altitudes: 5 m for parallax, 30–60 m for context.
- Mix movement types: reveal, orbit, push-in, pull-back, top-down.
- Record at the highest bitrate available.
- Always leave a battery buffer for unexpected headwinds.
The Bottom Line
The Night Hawk Drone hits that sweet spot where portability meets performance. It’s easy enough for a first-time pilot to feel confident, yet capable enough to deliver professional-looking footage when you lean into its gimbal, smart modes, and sensible camera settings. Pair it with a couple of extra batteries, learn to fly smoothly, follow local rules, and you’ll consistently bring home footage that looks far more “pro” than the effort it takes to capture it.
If you want, tell me how you plan to use your Night Hawk Drone (travel vlogs, real estate, outdoor sports, inspections), and I’ll tailor a shot list, camera settings, and a packing checklist specifically for your scenarios.
19 Aug 2025 - 20 Aug 2025